PineTreeStart

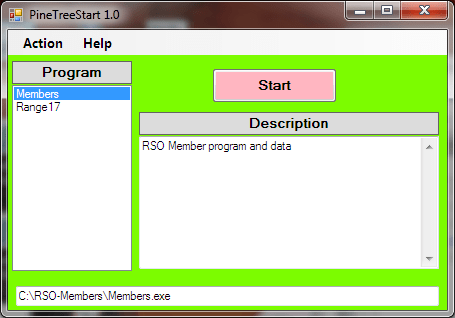
PineTreeStart is a startup program for starting portable programs. A portable program is a program that can run without being installed on a computer. After PineTreeStart starts a program, the program will operate the same as if it were started by a double click on the application exe file. The difference is that only one location needs to be remembered. It is hard to remember where the executable is. File extensions are now often turned off for known programs and that makes things harder.


A program like PineTreeStart can be used to solve these problems. A a program shortcut in windows has the drive letter as part of it’s name. This means you can’t use shortcuts with portable media like a removable disk or USB memory. For use with USB memory the PineTreeStart program, the config.txt file, and the TreeDoc help file should all be in the root directory of the USB device. All of the programs on the USB memory can be accessed thru the PineTreeStart program.
A portable program is one that doesn’t need to be installed. A portable program does not modify the computer’s registry or any associations. The only folders and files used or modified are the folder where the executable was located or a folder within that folder. The SnipAssist program is a portable program. This means you can have the program and a library of snippets on a USB device that can be used on any computer. There are many portable programs.


There are three files that need to be in the same folder on the disk or USB memory device to use PineTreeStart. There is the “PineTreeStart.exe” file that is the program. There is a “config.txt” file that has the information about programs on the disk or USB device. There is also the help file “PineTreeStart-Help.tdf”. These can be in the root directory of the USB device.
The config.txt file has a description of each program and where the program is located. The config.txt file is edited by the user. Any plain text editor can be used or the PineTreeStart edit dialog can be used. Each program is identified by a few features. First is the name of the program that will appear in the menu selection box. Next there is description that tells the user what to expect from the program. Then there is the loaction of the exe file for the selected program.
A line in the config file can be a comment which is ignored. It is important in any file that will be edited that it can have comments such as who edited it or when it was edited. It is also important to be able to comment out sections of the file.


Each portable program is stored in its own folder. The folder has the exe file of course. Any file used by the program should be in that folder like a config file or a help file. This usually means a config.txt file and a help file. A database of work files is often stored in a data folder to make it easier to back up, however, It is a good idea to backup the program along with the data.
Many parts of the C# code in PineTreeStart have been used in other programs. An effort was made to clean things up but there still may be some bits that have been missed. The “program.cs, TreeHelpDlg.cs, AboutDel.cs, Logger.cs, FormCommon.cs, ContxtMenuMgr.cs” files are all reused from other projects. Much of the “Globals.cs” file is also reused. The help file “PineTreeStart-Help.tdf” can be edited with the TreeDoc editor that is available at “PineTreeJoe.com”.


There are two ways the program PineTreeStart can be compiled. There is a constant “Gbls.DebugVersion”. If this is set to false, the normal user version will be compiled and the Logger will be disabled. If this constant is set to true the logger is enabled. If any changes are made to the program it is useful to set the constant = true to be able to see debug information in the generated log. The debug can then be turned off which will hide the logger for normal use.

PixClip

This is a utility program that was written in a very short time to solve a particular problem. When working with images it is nice to have a checkpoint you can go back to. I use Microsoft Paint for a lot of things but it does not have an undo. When working on something it is easy to copy the picture to the clipboard. If a mistake is made, the prior image can be had from the clipboard. It looked like a small utility that was able to display the clipboard or reload it would be very useful.
The program is very simple. There is only one code file: Form1. There are two buttons and some PictureBox controls. The ususal things like Help, About, and Logger that are in most PineTreeJoe programs were left out because they were not needed. All the PictureBox events are handled by a single routine. It will either put the image into the clipboard or get the image from the clipboard. This is an example of how something very simple can be very useful. The current program can save and display 8 images.


The whole time to develope it was less than half an hour after I figured out what I really needed. Unlike other PineTreeJoe programs there is no logger, no help, no about, or any other standard item. To make it smaller all the mouse clicks are handled by the same event handler. Most of the function headers were added using SnipAssist. It would be very easy to add more PictureBox controls. I thought about saving an image to disk or loading an image from disk, but neither looked useful enough to make it worth the effort. Another feature I might put in some day is to display the size of the image. This would require changing the basic structure.


There are two buttons for the two operations the program can do. The first is to copy the clipboard to one of the PictureBox controls when the PictureBox is clicked. The other operation is to copy the image from a PictureBox control to the clipboard when the PictureBox is clicked.
The first version had 4 pictures. The number of pictures was increased to 6 as two rows of three. Because of how the PixClip was used there was a request to make it 4 rows of 2 so it could be beside the picture editor. It is easy to make almost any shape or number of pictures. A VB.net version will be almost the same code.


If other things are being worked on and need temporary storage the PixClip idea can be extended to different things besides pictures.Some extra buttons or menu selections could add functionality like editing but it is probably a good idea to keep this program as simple as possible. If a picture is selected to get information the basic structure would need to be changed. A dedicated picture processing program would be better. This could be made into a dialog for use with a picture processing program.

LibAssist a Content Library Manager

LibAssist is an independent content manager. It has special features to work with programming languages but it can be used with any kind of file. Like SnipAssist it is easy to get things into and out of the library. Also there is a search feature to make it easy to find things.

There is a config.txt file to tell LibAssist how to handle files. Fist it says if the file type can be scanned for replacement items. Next it tells what program if any can be used to preview or edit the file. It also tells what associated files should be copied as a group.

SnipAssist is a program to manage a library of text parts. LibAssist is a program to manage a library of files. TreeDoc is an easy way to write a help file. When used together these programs can greatly increase productivity.

There can be any number of file names in the body of the item. When the item is created there is only one file unless the configuration says to associate other files with the selected file. After an item is created more file names can be added.

An open source version can be down loaded here.

TreeDoc a Tree Editor

TreeDoc is a tree structured editor. Unlike a plain text editor where you start a file and just start typing with a tree editor you must create a node to put the text in. New nodes can be added before, after or under an existing node. This makes for a tree structured text. A TreeDoc file can also be exported as a simple text file. This means you can work on an out line and then convert to normal text.

The HELP menu selection in the different PineTreeJoe programs use TreeDoc files. TreeDoc was written to make it easier to provide help for other programs. I was looking for something that looked pretty good and was less effort than html or chm. I found a couple of tree editors but didn’t like the format and none of them came with source code. So I wrote TreeDoc and released the source code for it.

Going Open Source

I am in the process of making the source code open source. Later I will develop a premium version that will not be open source.

The first program to be made open source is SnipAssist. The next one will be TreeDoc. Finally Catalogger will be released. In order to make a program open source it needs to be cleaned up. Commented out code needs to be removed. A license notice needs to be placed in the files. Also since I have been using Visual Studio for development I try compiling with SharpDevelop as a check.

The SnipAssist program has been in development for about 4 years. Some things that looked good at the time turned out not so good. The interface started with a ComboBox for folders, this has progressed to a TreeView. The editor was added later. The crypto dialog was added last year.

The general structure and some of the code is even older and goes back many more years. The logger evolved over a period of years. The lexical class and MacString are from an old compiler. The MultipleInputDlg was from a testing program.

How to use the code

First a working area is needed where the program can go and where the snippet library can be. This can be on any drive or even a USB memory. The folder should have the config.txt file and the SnipAssist-Help.tdf file. There also needs to be at least one folder for putting snips in.

To use the SnipAssist program you will need to compile it. Then move the SnipAssist.exe file to the folder where the SnipAssist-Help.tdf file is. Then make a shortcut and put the short cut on the desktop. The zip file has a sample file structure to use.

Some Useful Snippets

When writing code there are some small segments that are used many times. In some cases a word or something will need to be deleted or changed. It is usually less effort to delete something than it is to add or change something. These examples are all in C# but similar snippets are good for most programming languages. There are many other similar kinds of snippets. As more snippets are added to the library the more likely it is to find a needed short message or piece of code.

When I create buttons and menus I use this message to fill in until the code for the action is written. The title for the message is taken from a variable in the Gbls class. This way each message box can be coordinated with the main program.

MessageBox.Show("Feature Not Implemented", Gbls.ProgTitle,
     MessageBoxButtons.OK, MessageBoxIcon.Information);

This snippet is to inform the user that the action failed.

MessageBox.Show("Action Failed", Gbls.ProgTitle,
    MessageBoxButtons.OK,MessageBoxIcon.Information);

This snippet is to confirm that the user wants to delete something.

if (MessageBox.Show("Are you sure you want to delete?", Gbls.ProgTitle,
         MessageBoxButtons.YesNo, MessageBoxIcon.Warning) == DialogResult.Yes)
 {
 }

This snippet is for displaying how many items were found.

if (FoundCount == 0)
 {
     MessageBox.Show("No Snips Found", Gbls.ProgTitle,
         MessageBoxButtons.OK, MessageBoxIcon.Information);
 }
 else
 {
     MessageBox.Show(FoundCount.ToString() + " Snips Found", Gbls.ProgTitle,
         MessageBoxButtons.OK, MessageBoxIcon.Information);
 }

Writing Code

Every one talks about coding standards and formats. Some of these rules are good and some are bad and some just don’t matter very much. If you are getting paid to write code follow what ever standard is given to you no matter how bad it is. A happy customer is good to have.

If you are working for yourself you can probably do better. It is easier to work with code if you know what to expect. It is better to have a minimal set of rules that are followed than a big set of rules that are ignored. When I start to modify some new code I will often use tools I have to reformat the code and the comments to my standard.

I don’t like an embedded documentation thing like DoXygen. While it can produce a help file for people who do not have access to the source code, It makes the source code harder to read. Many of the things in the headers can be determined by just looking at the code. When the header is formatted the programmer not only needs to know the language they are working in but also the language for the header.

I often work with source code that has been written many years ago. When I need extra explanation for things in a class or method I put that in the description part of the SnipAssist snip I make so I can easily reuse anything I write.

The examples are for C# but can easily be modified for any language.

Why Headers

The headers in a file break it into pieces to make it easier to see the parts. They make the code look better and make it easy to read.

The file header will say why the file is here and what to expect in it. Often the author or creation date is included. If a big change has occurred I will often put that in the history section. I don’t usually put a project name in the file header because many files are reused in other projects. The exception is for the Form1.cs code file and the Globs.cs file. These are usually customized for a particular project.

The function or method header will have the name and say why it is here. There can be notes about what is does and how it does it. The lines break the listing into parts so it is easy to see where one thing ends and another begins.

To make things easier I have a library of SnipAssist snips for the different kinds of file, class and other headers I need. These make it possible to produce a lot of nice looking source code without all the all the effort of typing. These are useful for new code or for cleaning up existing code. Many headers are part of more complex snips that have some of the item being described.

One reason I have the header standards is to be able to produce certain design documents. There is a program that can extract the header information from the source code files and present it in a formatted report. That will be part of a future blog.

Sample Snippets

These are a few of the header snippets I use most. The descriptions are not shown but describe when to use them. Since a snippet is used for the headers, I have used the macro feature with default values to get even more for the same effort. A similar set of snippets will work with any language. When making a snippet it is better to have too much than too little. It is easier to delete a few lines than is to type them.

I usually replace the contents of the Program.cs file with a start sequence for the kind of program I am constructing. The example is for a simple WinForm program. I use a different snippet when a working folder needs to be found. Also for an editor a different snippet is needed when a command line argument needs to be captured.

//------------------------------------------------------------------------------
 //
 //NAME: Program.cs
 //
 //DESCRIPTION: This is the main function for the $"ProgramName"$ program
 //
 //HISTORY:
 //------------------------------------------------------------------------------
 //$"ToDay"$ $"Author","JBartel"$   Created
 //
 //------------------------------------------------------------------------------
 using System;
 using System.Collections.Generic;
 using System.IO;
 using System.Windows.Forms;
 namespace $"NameSpace","Bartel"$
 {
     //--------------------------------------------------------------------------
     //CLASS: Program
     //--------------------------------------------------------------------------
     static class Program
     {
         //----------------------------------------------------------------------
         //NAME: Main
         // The main entry point for the application.
         //----------------------------------------------------------------------
         [STAThread]
         static void Main()
         {
             Application.EnableVisualStyles();
             Application.SetCompatibleTextRenderingDefault(false);
             Application.Run(new Form1());
         }
     }
 }

The next is a file header. When need to add a source file I use an IDE to add a simple class file. I then open the file and use a snip to replace every thing in it. There are two main variations. The first is a new file that has a class in it. When working with Visual Studio I have a partial Form1 class that is similar.

//------------------------------------------------------------------------------
 //
 //NAME: $"Class"$.cs
 //
 //DESCRIPTION: This file has 
 //
 //HISTORY:
 //------------------------------------------------------------------------------
 //$"ToDay"$ $"Author","JBartel"$   Created
 //
 //------------------------------------------------------------------------------
 using System;
 using System.Collections.Generic;
 using System.IO;
 using System.Text;
 namespace $"NameSpace","Bartel"$
 {
     //--------------------------------------------------------------------------
     //CLASS: $"Class"$
     //--------------------------------------------------------------------------
     public class $"Class"$
     {
         //----------------------------------------------------------------------
         //NAME: $"Class"$
         //simple constructor
         //----------------------------------------------------------------------
         public $"Class$"()
         {
         }        
     }
 }

This header is for a class that is put in a file that already has code in it.
When adding a function from my code library the methods already have headers attached to them. The first header is a simple general purpose one that can go with almost anything.

SnipAssist an Independent Snippet Program

I have used many different programs over the years. I wanted a text snippet manager usable for many things that use text, not just for programming or word processing. The snip library had to be independent of any editor, IDE, word processor or any other program. This means that the clipboard is used for input and output. It also meant that the SnipAssist needed to be a separate program.

There are a few important design features. The first is the use of plain ASCII text for all the files involved. This means that in a pinch they can be converted to something else. Today disk storage is very cheap so efficiency is not as import as it was in the past. By using plain text files it is possible to use a program like WinMerge to compare snippet libraries. Also folders of snippets can be zipped up and sent as email attachments.

The SnipAssist program was not intended for a hot key kind of typing help. SnipAssist was intended for large pieces of text and large libraries of text pieces. This means that hot keys won’t work because they are limited to a few dozen snippets max and not thousands of them. With larger libraries these is a need for a big description as well as the body of the text part. The folders also get a description. A text snip can be 1000 lines if it needs to be. The description can be just as big. For larger pieces of text it is important to be able to review what is in a snippet before it is pasted in a file. If you are doing document assembly it is more important to be able to review the content. In some cases you need to choose between different snippets that are similar.

The snippets had to be easy to create. The harder it is to make a snippet the less likely it is to be done. With SnipAssist all you need to do is copy the text to the clipboard and click “New Snip” and give it a name. You should enter a description because you are likely to forget why it is there. There is also a header that can be used for administrative uses but it is not required.

Because SnipAssist was intended for larger libraries. This means that there needed to be a way to organize the snips. All snips are in folders that have a file describing what the folder is for. A folder can have a folder in it just like disk directories. Larger libraries also mean that a search feature is needed. A search can be done on the name, description, body, or any combination of these. A list of found snips is displayed. The snips can be easily examined to determine the correct one.

The free version is available now. In the future a premium version with extra features will be available.

Zip Files Available

I found it is not possible to make executable files available for down loading in WordPress. The same applies to zip files that contain an exe file. Also it is not really possible to email zip files if they have an exe file in them. The easiest solution so far has been to put the zip files on Google drive and make a public link to them. If you click on the link you go to Google drive and can down load the zip file. Any zip files that are only text will be available on this site.

I will update the files as bugs are discovered or features are added. Any new version will be compatible with anything produced by a prior version. My long term plan is to have a free version of each program and a premium version for a small price. Anything produced by the free version will be usable with the premium version and anything produced with the premium version will be usable with the free version.

The Catalogger program is for cataloging pdf files. The TreeDoc program is a tree structured editor and it was used to create the help files for all the programs. Any help file can be edited with the TreeDoc program. The SnipAssist program is an independent text snippet manager. It is good for larger collections of text or for collections of larger text. It will work with any editor.

In the next few weeks I will write about applications for the programs.

First Post

This is my first web site.

I am a retired software engineer with almost 50 years of working with computers. Some things have changed a lot since I started. Other things have changed very little.

When I retired, I decided to write what was fun and interesting and not just to make a living. My primary interest is in how programming and system development is done. In particular what kinds of tools and methods are used. I have my own favorite tools. I have also written several that I find very useful.

I will make some programs available for free. Sorry, these only run on windows and have only been tested on a desktop or laptop.